Project 1: GPS-based NTP server
Source: Microsecond accurate NTP with a Raspberry Pi and PPS GPS
Note: Seems the NTP server has an easier time starting if the GPS is NOT LOCKED before booting, so leave antenna unplugged UNTIL Pi has finished booting!
Info
This page describes setting up a GPS module with a Pi to act as a Stratum1Stratum 1 NTP server.
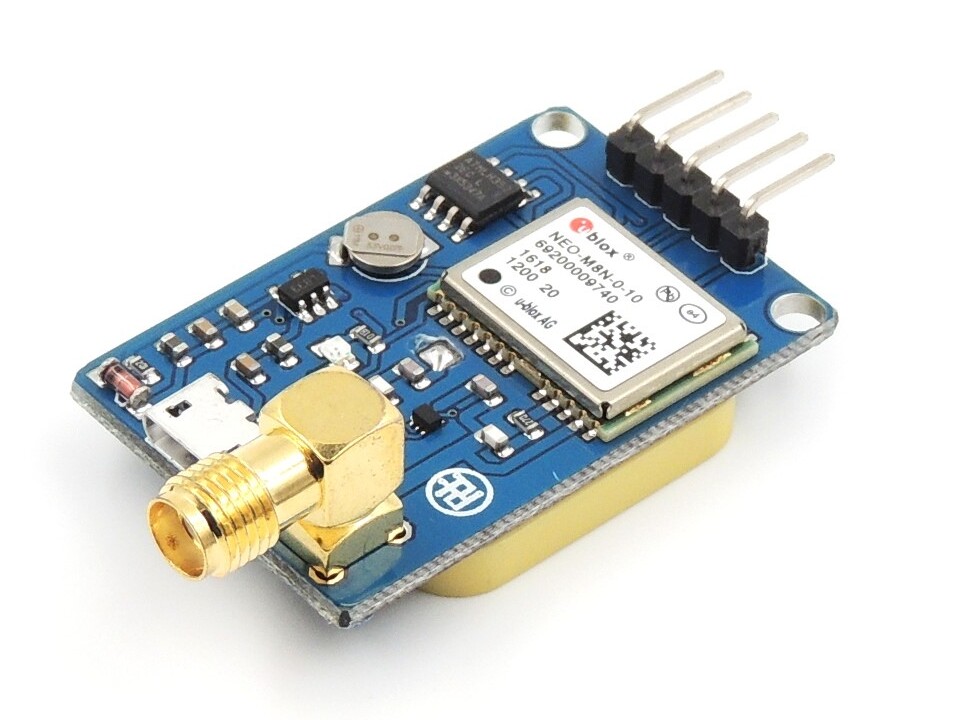
The GPS module mustI purchased is from the NEO-xM line (6M, 7M, 8M). The board looks similar to this:
Things of note: GPIO header, USB, included antenna module, and external antenna port:
- The GPIO header should have
a 3-5V input, with serial AND PPS outputs (5the pinsminimum).labelledExample:onAdafruitoneUltimateside of the board, preferrably in the same order as the pins on the Pi, so the GPSBreakout.boardCheapercanoption:plugsearchdirectlyforintoNEO-6M/7M/8Mit. - The
GPSmodulemodules.canMostbehaveconnectedantoantennaabuiltPC via USB, but that is not covered in(thethis guide. - The large white and tan ceramic block
withontantheedging),bottomit will be bypassed if you use an external antenna. Remote mountingof the moduletoisutilisea GPS receiver antenna. It can be used, but then thebuilt-inmoduleantennamustisbenotplacedreccommended,remotelyasfrom thelongPi,wirewhichmaycanthrow thecause timingoffissuesforwith the PPSsignal.line. - An external GPS antenna
andismountrecommended, which plugs into theGPSSMAmoduleport.directlyThetoon-boardtheantennaPiisheader.disabled in this case.
PPS = Pulse Per Second. While the serialserial/USB data from the GPS module contains the actual time & date information required for the NTP server, the PPS input is required to keep sub-millisecond accuracy. the PPS output putssends outa EXACTLY 1signal pulse perat the start of each second, +/- a few nanoseconds. The PPStime keeping software running on the Pi uses this.this second input to keep precise time.
Setup:
-
Install packages:
sudo apt install pps-tools gpsd gpsd-clients gpsd-tools chrony('pps/gpsd' packages are for interperating GPS data, chrony is
anthe actual NTP server) -
Add these lines to the end of
/boot/config.txt# the next 3 lines are for GPS & PPS signals dtoverlay=pps-gpio,gpiopin=18 enable_uart=1 init_uart_baud=9600These lines initialise pins on the Pi's GPIO header to enable the serial port, and set the PPS pin as an input.
-
Add this text to the end of
/etc/modules:to enable the PPS module:pps-gpio
These programs and config changes enable PPS time sync inputs on GPIO 18 (headern 12), and initializes the serial COM port with a baud rate of 9600.
- disable system handling of the COM
port:port (allows the GPS software to keep control of the port):sudo systemctl mask serial-getty@ttyS0.service
This prevents the system from taking control of the port. Check this command worked after rebooting:rebooting the Pi: /dev/ttyS0 should be owned by root:dialout and have permissions crw-rw----.
Wire up the GPS module:
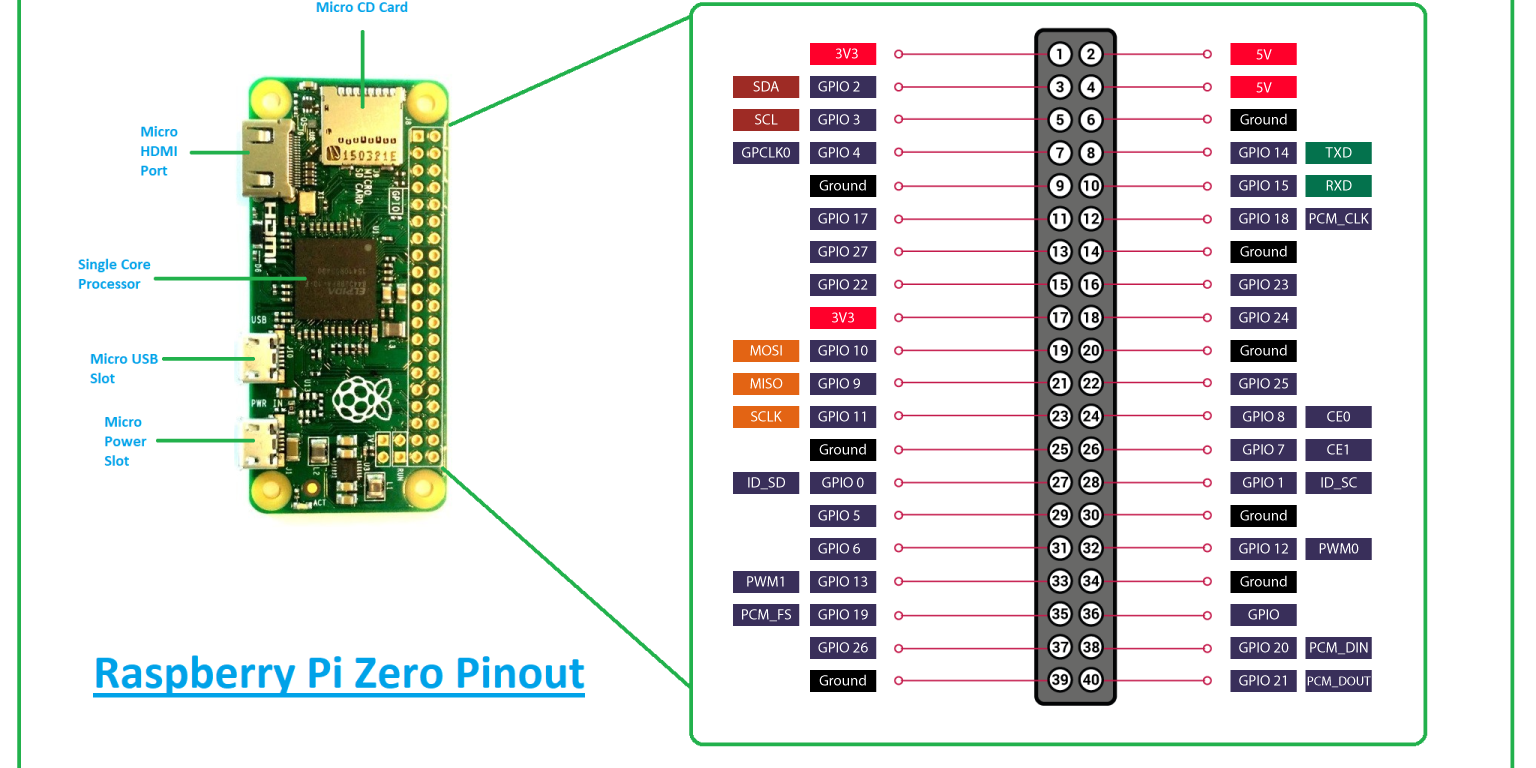
Pinout:
GPS PPS to RPi pin 12 (GPIO 18)- GPS VIN to
RPiheader pin 2 or 4 (+5Vbus) - GPS GND to RPi pin 6 (GND)
- GPS RX to RPi pin 8 (Pi TX)
- GPS TX to RPi pin 10 (Pi RX)
- GPS PPS to header pin 12 (GPIO 18)
Picture reference (noteall Pi's have the same header):
 Note that all the
 Pirequired pins on the Pi header are seqential):sequential. 
Check GPS functionality
The GPS device should put out either 3.3V or 5V on the antenna connector to power the antenna. With the GPS module powered,powered via the Pi, The on-board LED will light solid.a solid color. The LED will start blinking once it has a GPS lock.lock, Theand modulewill spitsstart sending GPS data to(called "NMEA" data) via the serial lineslines. atOnce allthe times,Pi therehas booted, check that the GPS module is no bi-directional communication!working:
-
Check that the pps serice is running:
lsmod | grep ppsShould return
at leastthe servicepps_core., and sometimes other services as well, they can be ignored. -
Check the PPS input for
PPSgood pulses (after GPS has alock)lock, ie the indicator light is blinking):sudo ppstest /dev/pps0###Output:Example output:
trying PPS source "/dev/pps0"
found PPS source "/dev/pps0"
ok, found 1 source(s), now start fetching data...
source 0 - assert 1655253832.999996389, sequence: 966 - clear  0.000000000, sequence: 0
source 0 - assert 1655253834.000004254, sequence: 967 - clear  0.000000000, sequence: 0
source 0 - assert 1655253835.000001120, sequence: 968 - clear  0.000000000, sequence: 0
source 0 - assert 1655253836.000000985, sequence: 969 - clear  0.000000000, sequence: 0
source 0 - assert 1655253836.999996852, sequence: 970 - clear  0.000000000, sequence: 0
source 0 - assert 1655253838.000001719, sequence: 971 - clear  0.000000000, sequence: 0
source 0 - assert 1655253839.000002586, sequence: 972 - clear  0.000000000, sequence: 0
source 0 - assert 1655253840.000001453, sequence: 973 - clear  0.000000000, sequence: 0
### ...etc
If there is a timout, then there is likely not a good GPS lock yet.
Set up software:
Enable the GPS decoder software and the NTP server:
- Edit
/etc/default/gpsd:- change
GPSD_OPTIONS=””toGPSD_OPTIONS=”-n” - change
START_DAEMON="false"toSTART_DAEMON="true" - change
DEVICES=””toDEVICES=”/dev/ttyS0 /dev/pps0″
- change
- edit
/etc/chrony/chrony.conffile, add this block of code to the top:### GPS TIME SYNC INFO #'delay'GPSdescribesreferencethe accuracy drift of the time source, in seconds. Larger numbers deprioritizes the source. NMEA Source needs at least some delay else chrony loses sync. # 'offset' adjusts source arrival time forwarddefines andbackward. Use to sync GPS and PPS signals (time in [brackets] in chrony sources list).adjustments: refclock SHM 0 delay 0.1 offset 0.1165 refid NMEA refclock PPS /dev/pps0 refid PPS # Allow all LAN IP Ranges so NTP server is network-agnostic (can be used on any LAN): allow 10.0.0.0/8 allow 192.168.0.0/16 allow 172.16.0.0/12 ### END GPS TIME SYNC INFONotes:
- 'delay 0.1' describes the accuracy of the serial time source, in seconds. Larger numbers deprioritizes the source (sources with smaller delays have higher priority). NMEA Source needs a non-zero delay, else chrony refuses to use it.
- 'offset' adjusts the fixed offset delay on the NMEA source. Use to sync GPS and PPS signals for higher accuracy.
- Due to an inconsistency with the Pi Zero, the
gpsdservice often starts in an active (disabled) state. This can be solved by restarting the service. To restart automatically, add the following line to the file/etc/rc.local:
/usr/sbin/service gpsd restart
4) Reboot the Pi.
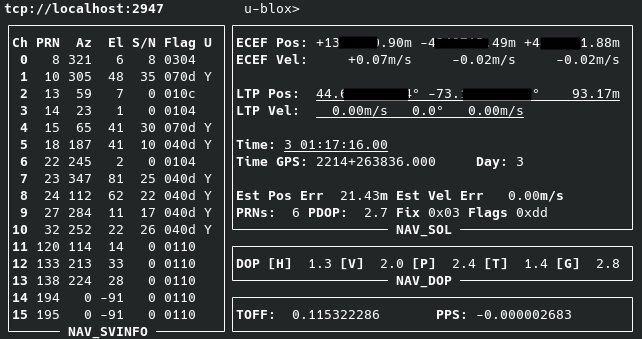
5) Check NMEA function: after rebooting, run the program
gpsmon
This confirms that the software is decoding the GPS info properly.
- Check Chrony is selecting GPS as a time source; run
chronyc sources###
Output:
More info here under the header 'Time Sources'. TLDR: 'PPS' should have a '*' next to it, indicating it is the primary time source (may take up to 5 minutes to update the primary source after GPS is locked), and the [bracketed] time in the 'NMEA' row should be less than ~5msec. change theMS Name/IP address Stratum Poll Reach LastRx Last sample =============================================================================== #- NMEA 0 4 377 15 +3794us[+3794us] +/- 470us #* PPS 0 4 377 16 +351ns[ +515ns] +/- 3000ns ^- time.cloudflare.com 3 6 377 70 -2009us[-2008us] +/- 16ms ^- smtp.us.naz.com 2 6 377 2 -26ms[ -26ms] +/- 105ms ^- hc-007-ntp1.weber.edu 2 6 377 5 +3131us[+3131us] +/- 72ms ^- dns2.kcweb.net 2 6 377 6 +1296us[+1296us] +/- 88msoffset'offset' value (step 2) in thechrony.conffile to adjust this bracketed value, and restart chrony with the commandsudo systemctl restart chrony. A "Reach" of '377' indicates source was polled sucessfully all 8 of the last 8 tries, a higher reach value for a source marks it as more trustworthy, and upstrustworthiness.the source's priority. Lower numbers mean polls have been missed, an the source is less reliable.
Set up other machines to use the Pi as an NTP server (Linux):
- Install
ntppackage on the machine - Edit
/etc/ntp.confand addserver [pi.local.ip] trueto the list of servers - start the ntp service (on Arch:
sudo systemctl start ntpd) - Check the NTP sources with
ntpq -p:
Check back in about 20 minutes, after which one source should have a '*' next to it to indicate that server is the chosen server. Remove default NTP servers and restart the ntp service if the pi is not selected. Note:remote refid st t when poll reach delay offset jitter ============================================================================== *192.168.1.137 .PPS. 1 u 35 64 1 1.851 +144501 0.001 +time.walb.tech 50.205.244.21 3 u 34 64 1 82.802 +144501 0.001 -li1187-193.memb 132.163.96.3 2 u 30 64 1 179.522 +144501 0.001 +time-dfw.0xt.ca 68.166.61.255 2 u 33 64 1 106.817 +144501 0.001 +LAX.CALTICK.NET 17.253.26.253 2 u 32 64 1 118.527 +144501 0.001trueadded after the pi's IP in the config indicates it is more "trustworthy" than other sources, and is more likely to be picked. - If NTP source is registered correctly, and you are ready to use NTP, enable the ntp service (on Arch:
sudo systemctl enable ntpd)
Set up other machines to use the Pi as an NTP server (Windows):
- Install Dimension 4.
- add the pi as an SNTP source, set the sync time to every 5 minutes.
- In the advanced settings menu, force the program to only sync the selected server to force it to use the pi.
