
Project 1: GPS-based NTP server
Source: Microsecond accurate NTP with a Raspberry Pi and PPS GPS
Info
This page describes setting up a GPS module with a Pi to act as a Stratum 1 NTP server.
The GPS module I purchased is from the NEO-xM line (6M, 7M, 8M). The board looks similar to this:
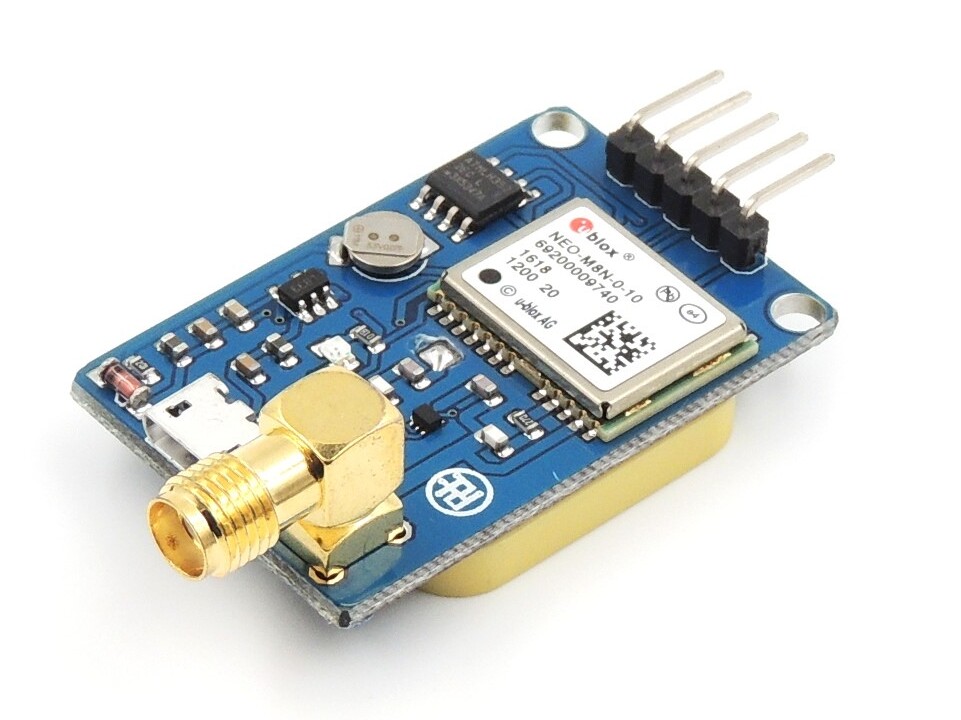
Things of note: GPIO header, USB, included antenna module, and external antenna port:
- The GPIO header should have the pins labelled on one side of the board, preferrably in the same order as the pins on the Pi, so the GPS board can plug directly into it.
- The module can be connected to a PC via USB, but that is not covered in this guide.
- The large white and tan ceramic block on the bottom of the module is a GPS receiver antenna. It can be used, but then the module must be placed remotely from the Pi, which can cause timing issues with the PPS line.
- An external GPS antenna is recommended, which plugs into the SMA port. The on-board antenna is disabled in this case.
PPS = Pulse Per Second. While the serial/USB data from the GPS module contains the actual time & date information required for the NTP server, the PPS input is required to keep sub-millisecond accuracy. the PPS output sends a signal pulse at the start of each second, +/- a few nanoseconds. The time keeping software uses this second input to keep precise time.
Setup:
-
Install packages:
sudo apt install pps-tools gpsd gpsd-clients gpsd-tools chrony('pps/gpsd' packages are for interperating GPS data, chrony is the actual NTP server)
-
Add these lines to
/boot/config.txt:# ADD AT THE TOP OF THE FILE: # Disable boot delay entirely, this keeps the GPS board from interrupting boot. bootdelay=-2 ... # ADD AT THE END OF THE FILE: # the next 3 lines are for GPS & PPS signals dtoverlay=pps-gpio,gpiopin=18 enable_uart=1 init_uart_baud=9600These lines initialise pins on the Pi's GPIO header to enable the serial port, and set the PPS pin as an input. Aditionally, these settings disable the system's default boot delay, a momentary "press any key to pause boot" portion, used for advanced troubleshooting. This mode can be activated by the GPS board if it starts sending data before the Pi finishes its boot sequence, which leaves the system in a pre-boot state, making it functionally useless. This setting forces the Pi to skip the mode entirely.
-
Add this text to the end of
/etc/modulesto enable the PPS module:pps-gpio -
disable system handling of the COM port (allows the GPS software to keep control of the port):
sudo systemctl mask serial-getty@ttyS0.serviceCheck this command worked after rebooting the Pi:
/dev/ttyS0should be owned byroot:dialoutand have permissionscrw-rw----. NOTE: the port may have a different name besidesttyS0, such asttyAMA0orttyAMC0, adjust this command, and those in future steps, to accomodate.
Wire up the GPS module:
Pinout:
| rPi Pin | Pin Name | GPS Pin |
|---|---|---|
| 2 or 4 | +5V Bus | VIN |
| 6 | GND/0V | GND |
| 8 | Serial TX | RX |
| 10 | Serial RX | TX |
| 12 | GPIO 18 | PPS |
(Note that the TX/RX pins are crossed, the TX of one device needs to go to the RX of the other!)
Picture reference (all Pi's have the same header):
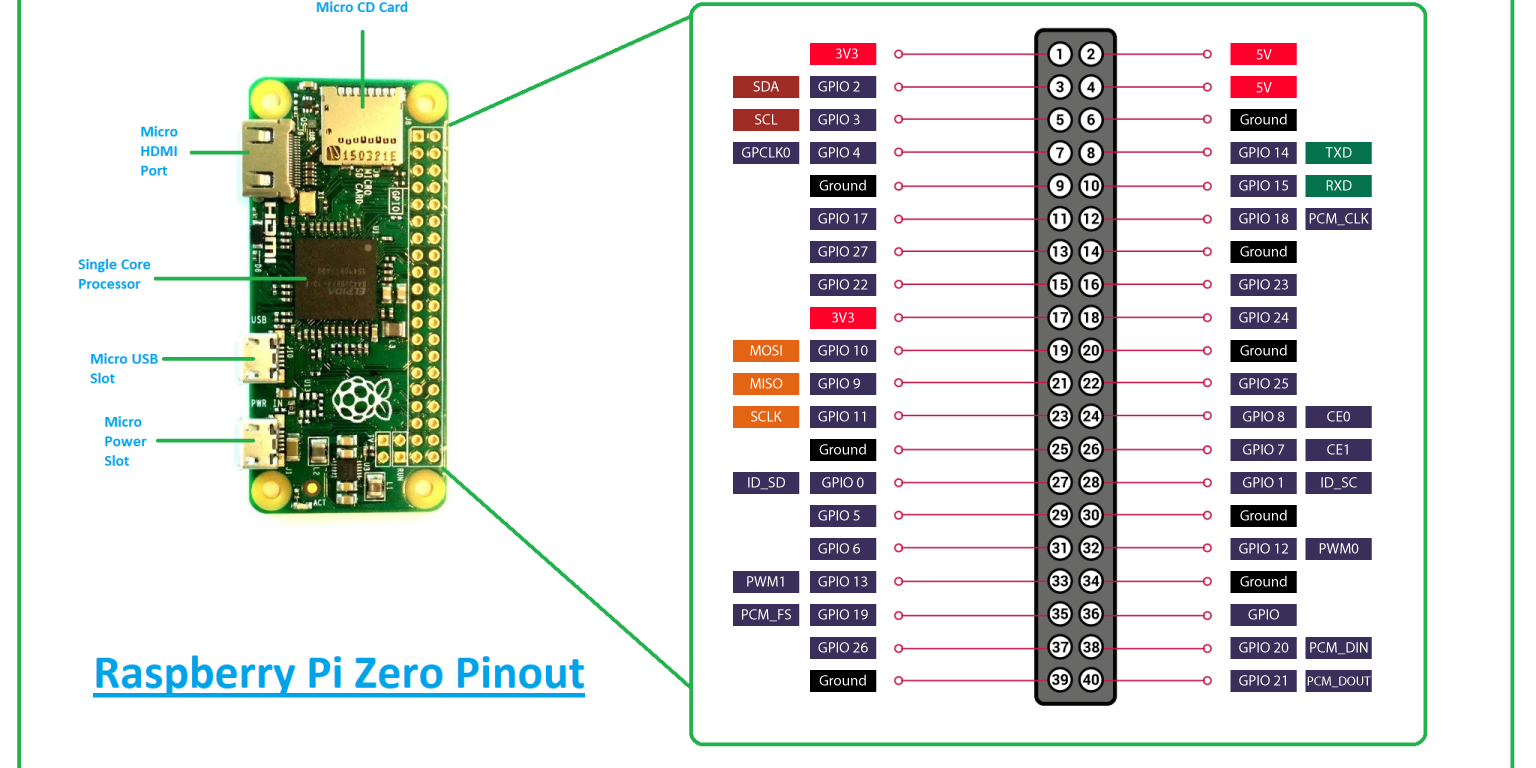 Note that all the required pins on the Pi header are sequential. Most GPS modules with headers are pin-compatible with the Pi, however some swap the positions of the TX and RX pins (The 'TX' of the GPS module must go the the 'RX' pin on the header, and vice-versa.) If the GPS is not detected when you plug it into the header, try extending the header with jumper wires and crossing over the TX/RX pins.
Check GPS functionality
With the GPS module powered via the Pi, The on-board LED will light a solid color. The LED will start blinking once it has a GPS lock, and will start sending GPS data (called "NMEA" data) via the serial lines. Once the Pi has booted, check that the GPS module is working:
-
Check that the pps serice is running:
lsmod | grep ppsShould return the service
pps_core, and sometimes other services as well, they can be ignored. -
Check the PPS input for good pulses (after GPS has a lock, ie the indicator light is blinking):
sudo ppstest /dev/pps0Example output:
trying PPS source "/dev/pps0"
found PPS source "/dev/pps0"
ok, found 1 source(s), now start fetching data...
source 0 - assert 1655253832.999996389, sequence: 966 - clear  0.000000000, sequence: 0
source 0 - assert 1655253834.000004254, sequence: 967 - clear  0.000000000, sequence: 0
source 0 - assert 1655253835.000001120, sequence: 968 - clear  0.000000000, sequence: 0
source 0 - assert 1655253836.000000985, sequence: 969 - clear  0.000000000, sequence: 0
source 0 - assert 1655253836.999996852, sequence: 970 - clear  0.000000000, sequence: 0
source 0 - assert 1655253838.000001719, sequence: 971 - clear  0.000000000, sequence: 0
source 0 - assert 1655253839.000002586, sequence: 972 - clear  0.000000000, sequence: 0
source 0 - assert 1655253840.000001453, sequence: 973 - clear  0.000000000, sequence: 0
### ...etc
If there is a timout, then there is likely not a good GPS lock yet.
Set up software:
Enable the GPS decoder software and the NTP server:
- Edit
/etc/default/gpsd:- change
GPSD_OPTIONS=””toGPSD_OPTIONS=”-n” - change
START_DAEMON="false"toSTART_DAEMON="true" - change
DEVICES=””toDEVICES=”/dev/ttyS0 /dev/pps0″
- change
- Edit
/etc/chrony/chrony.conffile, add this block of code to the top:### GPS TIME SYNC INFO # GPS reference defines and adjustments: refclock SHM 0 delay 0.1 offset 0.1165 refid NMEA refclock PPS /dev/pps0 refid PPS # Allow all LAN IP Ranges so NTP server is network-agnostic (can be used on any LAN): allow 10.0.0.0/8 allow 192.168.0.0/16 allow 172.16.0.0/12 ### END GPS TIME SYNC INFONotes:
- 'delay 0.1' describes the accuracy of the serial time source, in seconds. Larger numbers deprioritizes the source (sources with smaller delays have higher priority). NMEA Source needs a non-zero delay, else chrony refuses to use it. Leave this number alone.
- 'offset 0.1165' adjusts the fixed offset delay, in seconds, on the NMEA source. Edit this offset to allign GPS and PPS timing, for higher accuracy.
- Due to an inconsistency with the Pi Zero, the
gpsdservice often starts in an "active (disabled)" state. This can be solved by forcing the service to start later in the boot process. Edit the "[Install]" section of thegpsdservice file,/lib/systemd/system/gpsd.service:
[Unit]
Description=GPS (Global Positioning System) Daemon
After=sysinit.target

[Service]
Type=forking
EnvironmentFile=-/etc/default/gpsd
ExecStart=/usr/sbin/gpsd $GPSD_OPTIONS $OPTIONS $DEVICES

[Install]
WantedBy=multi-user.target
Also=gpsd.socket
# add this line to force gpsd to wait until chrony starts before running:
WantedBy=chronyd.service
- Re-enable the 'gpsd' service:
sudo systemctl disable gpsd && sudo systemctl enable gpsd
- Reboot the Pi.
- Check NMEA function: after rebooting, run the program
gpsmon, it may sit on a blank screen for up to 60 seconds, but afterwards will display a window similar to this:
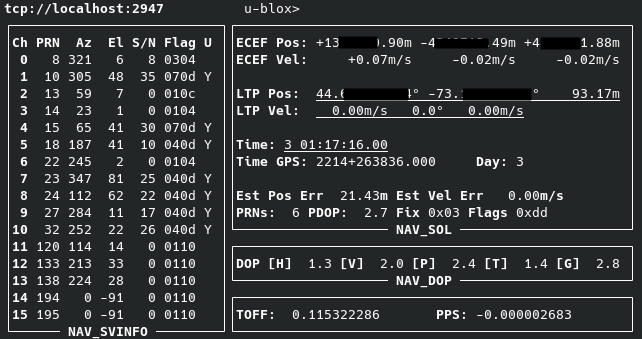
This confirms that the software is decoding the GPS info properly.
- Check Chrony is selecting GPS as a time source; run
chronyc sources
Output:
More info here under the header 'Time Sources'. TLDR: 'PPS' should have a '*' next to it, indicating it is the primary time source (may take up to 5 minutes to update the primary source after GPS is locked), and the [bracketed] time in the 'NMEA' row should be less than ~5msec. change the 'offset' value (step 2) in theMS Name/IP address Stratum Poll Reach LastRx Last sample =============================================================================== #- NMEA 0 4 377 15 +3794us[+3794us] +/- 470us #* PPS 0 4 377 16 +351ns[ +515ns] +/- 3000ns ^- time.cloudflare.com 3 6 377 70 -2009us[-2008us] +/- 16ms ^- smtp.us.naz.com 2 6 377 2 -26ms[ -26ms] +/- 105ms ^- hc-007-ntp1.weber.edu 2 6 377 5 +3131us[+3131us] +/- 72ms ^- dns2.kcweb.net 2 6 377 6 +1296us[+1296us] +/- 88mschrony.conffile to adjust this bracketed value, and restart chrony with the commandsudo systemctl restart chrony. A "Reach" of '377' indicates source was polled sucessfully all 8 of the last 8 tries, a higher reach value for a source marks it as more trustworthy, and ups the source's priority. Lower numbers mean polls have been missed, and the source is marked as less reliable.
Set up secondary NTP sources:
- Install the
chronypackage - echo your primary server to a new chrony service config file:
(repeat for multiple sources, incrementingsudo echo 'server 192.168.x.x iburst' > /etc/chrony/sources.d/local-ntp-server1.sourcesserver1,server2, etc. - Re-load chrony sources:
sudo chronyc reload sources
Set up other machines to use the Pi as an NTP server (Linux):
- Install
ntppackage on the machine - Edit
/etc/ntp.confand addserver [pi.local.ip] trueto the list of servers - start the ntp service (on Arch:
sudo systemctl start ntpd) - Check the NTP sources with
ntpq -p:
Check back in about 20 minutes, after which one source should have a '*' next to it to indicate that server is the chosen server. Remove default NTP servers and restart the ntp service if the pi is not selected. Note:remote refid st t when poll reach delay offset jitter ============================================================================== *192.168.1.137 .PPS. 1 u 35 64 1 1.851 +144501 0.001 +time.walb.tech 50.205.244.21 3 u 34 64 1 82.802 +144501 0.001 -li1187-193.memb 132.163.96.3 2 u 30 64 1 179.522 +144501 0.001 +time-dfw.0xt.ca 68.166.61.255 2 u 33 64 1 106.817 +144501 0.001 +LAX.CALTICK.NET 17.253.26.253 2 u 32 64 1 118.527 +144501 0.001trueadded after the pi's IP in the config indicates it is more "trustworthy" than other sources, and is more likely to be picked. - If NTP source is registered correctly, and you are ready to use NTP, enable the ntp service (on Arch:
sudo systemctl enable ntpd)
Set up other machines to use the Pi as an NTP server (Windows):
Change the system's time server settings to the Pi's local IP address, or install your NTP sync program of choice (one options is Dimension 4.)
Adding a hardware RTC (real-time clock) to the NTP Pi servers:
This step is only required for Pi zeros and Model B Pi's older than the Pi 5. Full-size computers have these RTC's built-in, and so do not need further configuration. Pi's, however, do not, and as such require a hardware add-on board.
Follow this guide from AdaFruit (assumes you are using one of the modules they list) to install and configure the RTC.
Note that since this guide was written, the hwclock binary was moved from the util-linux package (pre-installed) to util-linux-extra, which will have to be installed alongside the i2c packages!
Also note that per this post on the Adafruit forums, editing the udev file is no longer necessarry, which is good, since the file no longer exists on Debian Trixie (the latest OS version as of DEC. 2025). The question of if the fact that this file is missing entirely will cause issues, is unknown.
No Comments